How to configure Remote GTK for Windows Seven : Différence entre versions
| Ligne 54 : | Ligne 54 : | ||
| − | Then | + | Then go to the seetings servers tab, |
| − | [[ | + | [[Image:Capture7water.png|thumb|none|300px|]] |
| − | 1 - | + | 1 - Add your server. |
| − | + | Select it and then | |
| − | + | 2 - Rename it, | |
| − | 4 - | + | 3 - In Host, enter your server address without ftp or http. |
| + | |||
| + | 4 - Enter the HTTP port of your server. | ||
| + | |||
| + | 5 - Save your configuration. | ||
| + | |||
| + | then, | ||
| + | |||
| + | Go to the Authentication tab. | ||
| + | |||
| + | [[Image:Capture8water.png|thumb|none|400px|]] | ||
| + | |||
| + | 1 - Enter your user name. | ||
| + | |||
| + | 2 - Enter your password. | ||
| + | |||
| + | tick "Enable authentication" | ||
Version du 10 avril 2012 à 16:28
Sommaire
Download the application
To download the application, go to this address :
Then click on the link to retrieve the application on your pc.
A "Security Warning" window appears:
Click on Save
Your application is now ready to be configured.
Configure the application
BEFORE INSTALLING, YOU MUST RUN THE SOFTWARE COMPATIBLE WITH YOUR SYSTEM.
For that, thank you for following the steps:
1 - Go to the folder where transmission has been downloaded.
Select it and right click to access the file properties
2 - Go to the Compatibility tab
Then choose to make the program compatible with service pack 3 for Windows XP.
Finally, click Apply.
Your software is now ready to be installed.
Installing the software on your PC
For all the steps that follow, we recommend not to change the default options.
Once all these install steps are done, your software is ready for use.
Using the software
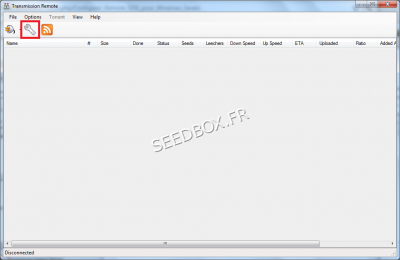
From your software interface, click the wrench, then local seetings.
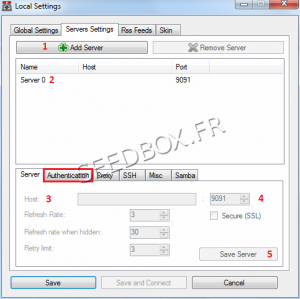
Then go to the seetings servers tab,
1 - Add your server.
Select it and then
2 - Rename it,
3 - In Host, enter your server address without ftp or http.
4 - Enter the HTTP port of your server.
5 - Save your configuration.
then,
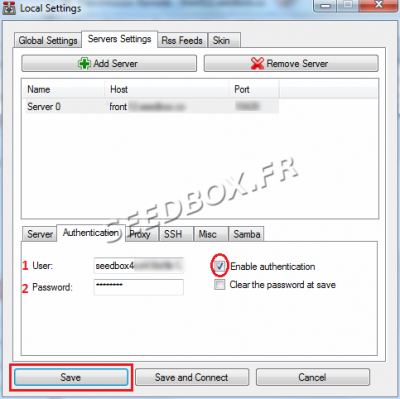
Go to the Authentication tab.
1 - Enter your user name.
2 - Enter your password.
tick "Enable authentication"
All these informations are available in your manager.
Your software is now ready for use.


