Install an Ftp client Seedbox.fr for Linux Ubuntu : Différence entre versions
De Documentation officielle Seedbox
Aller à la navigationAller à la recherche| (36 révisions intermédiaires par 2 utilisateurs non affichées) | |||
| Ligne 1 : | Ligne 1 : | ||
= Download and install FileZilla = | = Download and install FileZilla = | ||
| − | Download the latest FileZilla version for Windows, Mac and Linux | + | *Download the latest FileZilla version for Windows, Mac and Linux |
http://filezilla-project.org/download.php?type=client | http://filezilla-project.org/download.php?type=client | ||
| − | |||
| − | |||
| − | |||
| − | |||
| − | |||
==Configuring FileZilla== | ==Configuring FileZilla== | ||
| − | After installing the software, configure FileZilla to connect with your | + | *After installing the software, configure FileZilla to connect with your Server. |
| − | You can configure FileZilla to manage multiple connections to several different | + | *You can configure FileZilla to manage multiple connections to several different servers. |
==Configuring the FTP connection== | ==Configuring the FTP connection== | ||
| − | Start FileZilla ... | + | *Start FileZilla ... |
| − | |||
... and access the site manager | ... and access the site manager | ||
| Ligne 27 : | Ligne 21 : | ||
==Site Manager== | ==Site Manager== | ||
| − | Click on New Site | + | *Click on New Site |
| + | [[Image:Fz3.png|thumb|none|500px|]] | ||
| − | |||
| − | + | *Then fill out the required fields (yellow), taking care to respect the case sensitive password. | |
| − | + | [[Image:FTPLINUXOK1WATER.png.png|thumb|none|500px|]] | |
| + | #In host : Enter your servername WITHOUT any http or ftp. | ||
| + | ##in Port : Let the box blank or enter port 21. | ||
| + | ##'''No other port other than 21 can be enter here''' | ||
| + | #In protocol, choose FTP | ||
| + | #Encryption, choose "Plain FTP" or TLS if available | ||
| + | #Logontype MUST be acount. | ||
| + | #User is the login chosen | ||
| + | #Passord, it's the one choen with your login | ||
| + | #Chosse a name for your account, the one you want. | ||
| + | *The connection details are shown in your Manager in ''Advanced configuration'' thumbnail. | ||
| − | + | *Finally, click ok to save your account and connect to your service. | |
| − | + | =Presentation and use FileZilla to manage files = | |
| − | |||
| + | *Once connected, the FileZilla interface looks like this: | ||
| − | + | [[Image:Fz6.png|thumb|none|500px|]] | |
| − | + | *1 = Messages sent and received by service. | |
| − | + | *2 = What's in your own computer | |
| − | + | *3 = Contents of your service | |
| − | = | + | *4 = Information transfer (success, failure or waiting etc.) |
| − | |||
| + | ==Transferring a file from your service to your PC== | ||
| + | *To transfer a file from service to your computer, simply select it from the zone 3 and make a right click to select Download | ||
| − | |||
| − | |||
| + | ==Transfer a file from your computer to the online service== | ||
| + | *To transfer a file from your computer to your service, simply select it from the zone 2 and make a right click to select Upload | ||
| − | = | + | =FileZilla with the Proxy= |
| − | |||
| − | |||
| − | |||
| − | |||
| − | |||
| − | |||
| − | |||
| − | |||
| − | |||
| − | |||
| − | + | '''Note : Setting up your Proxy Service ONLY if encountered some connections issus such as Time out ''' | |
| − | + | [[Image:proxydetailswater.png|thumb|right|300px|]] | |
| − | + | [[Image:proxyredwater.png|thumb|none|500px|]] | |
| − | + | *Choose the '''generic proxy HTTP/1.1''' | |
| − | |||
| − | |||
| − | + | *1 - Enter '''your server address''' '''without ftp or http''' | |
| + | example : front123.sdbx.co | ||
| − | - | + | *2 - Enter your '''proxy port Here'''. |
| − | + | '''Your proxy port has to be added ONLY here. In NO case, you proxy port has to be set up elsewhere''' | |
| − | + | *3 - Enter '''your username''' | |
| − | + | *4 - Enter '''your password.''' | |
Version actuelle datée du 15 février 2018 à 16:20
Sommaire
Download and install FileZilla
- Download the latest FileZilla version for Windows, Mac and Linux
http://filezilla-project.org/download.php?type=client
Configuring FileZilla
- After installing the software, configure FileZilla to connect with your Server.
- You can configure FileZilla to manage multiple connections to several different servers.
Configuring the FTP connection
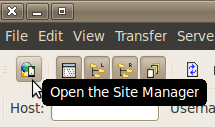
- Start FileZilla ...
... and access the site manager
Site Manager
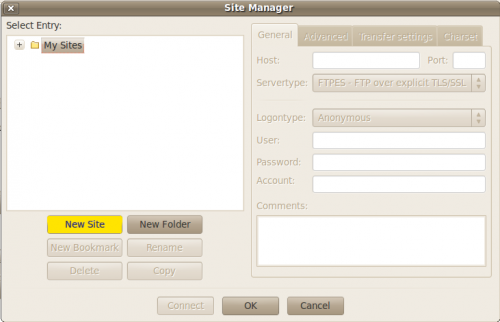
- Click on New Site
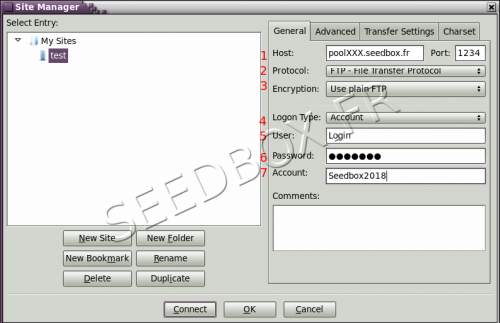
- Then fill out the required fields (yellow), taking care to respect the case sensitive password.
- In host : Enter your servername WITHOUT any http or ftp.
- in Port : Let the box blank or enter port 21.
- No other port other than 21 can be enter here
- In protocol, choose FTP
- Encryption, choose "Plain FTP" or TLS if available
- Logontype MUST be acount.
- User is the login chosen
- Passord, it's the one choen with your login
- Chosse a name for your account, the one you want.
- The connection details are shown in your Manager in Advanced configuration thumbnail.
- Finally, click ok to save your account and connect to your service.
Presentation and use FileZilla to manage files
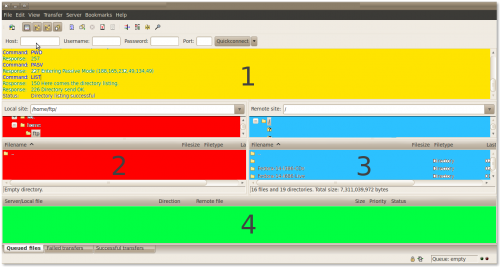
- Once connected, the FileZilla interface looks like this:
- 1 = Messages sent and received by service.
- 2 = What's in your own computer
- 3 = Contents of your service
- 4 = Information transfer (success, failure or waiting etc.)
Transferring a file from your service to your PC
- To transfer a file from service to your computer, simply select it from the zone 3 and make a right click to select Download
Transfer a file from your computer to the online service
- To transfer a file from your computer to your service, simply select it from the zone 2 and make a right click to select Upload
FileZilla with the Proxy
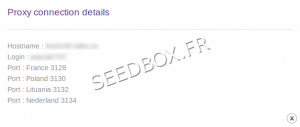
Note : Setting up your Proxy Service ONLY if encountered some connections issus such as Time out
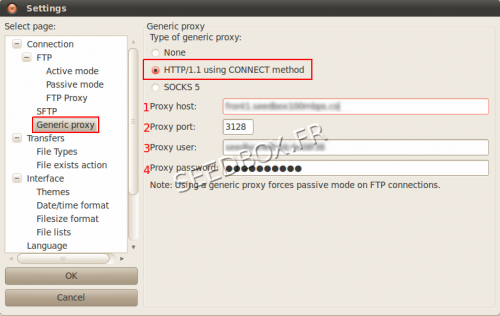
- Choose the generic proxy HTTP/1.1
- 1 - Enter your server address without ftp or http
example : front123.sdbx.co
- 2 - Enter your proxy port Here.
Your proxy port has to be added ONLY here. In NO case, you proxy port has to be set up elsewhere
- 3 - Enter your username
- 4 - Enter your password.
