Configure the VPN for Mac OSX : Différence entre versions
De Documentation officielle Seedbox
Aller à la navigationAller à la recherche| (5 révisions intermédiaires par le même utilisateur non affichées) | |||
| Ligne 1 : | Ligne 1 : | ||
| − | = | + | ==Information== |
| + | |||
| + | *''This software needs for people to be confortable with computing.'' | ||
| + | |||
| + | *''If it's not your case, please have a look to PPTP VPN instead.'' | ||
| + | |||
| + | |||
| + | *''VPN service is not designed to change your Ip adress.'' | ||
| + | |||
| + | *''To do that, please have a look at our Web Proxy. (Available in this Wiki. Section 13)'' | ||
| − | |||
| − | '' | + | *'''This tutorial has to be follow STEP BY STEP''' |
| + | =Prerequisites= | ||
| − | + | *You will need the '''OpenVPN configuration file'''. | |
| − | |||
| + | '''Prepare a file named config.doc with the following text'''. | ||
| − | ''Remember to replace your servername'' by the name of your server seedbox: | + | |
| + | '''Remember to replace your servername''' by the name of your server seedbox Without any HTTP or FTP : | ||
client | client | ||
| Ligne 46 : | Ligne 56 : | ||
| − | + | * Get the security certificate available in your manager. | |
| − | To download it, go to your manager, then in ''Addional Services.'' | + | *To download it, '''go to your manager''', then in '''Addional Services.''' |
| − | |||
[[Fichier:vpndetailswater.png|thumb|none|300px|]] | [[Fichier:vpndetailswater.png|thumb|none|300px|]] | ||
| − | |||
| − | Please go to this address: | + | |
| + | * '''Now, you need to download and install the VPN client Tunnelblick''' | ||
| + | |||
| + | *Please go to this address: | ||
http://code.google.com/p/tunnelblick/wiki/DownloadsEntry?tm=2 | http://code.google.com/p/tunnelblick/wiki/DownloadsEntry?tm=2 | ||
| Ligne 65 : | Ligne 76 : | ||
==Installation and Configuration== | ==Installation and Configuration== | ||
| − | When you launch Tunnelblick, click I Have configuration files | + | *When you launch Tunnelblick, click '''I Have configuration files''' |
[[fichier:500px-Vpnmac3water.png]] | [[fichier:500px-Vpnmac3water.png]] | ||
| − | Then click on OpenVPN configuration | + | *Then, click on '''OpenVPN configuration''' |
[[fichier:500px-Vpnmac4water.png]] | [[fichier:500px-Vpnmac4water.png]] | ||
| − | Then click Create Tunnelblick VPN Configuration | + | Then, click '''Create Tunnelblick VPN Configuration''' |
[[fichier:500px-Vpnmac5water.png]] | [[fichier:500px-Vpnmac5water.png]] | ||
| − | A new window informs you that your VPN has been created. | + | *A new window informs you that your VPN has been created. |
[[fichier:500px-Vpnmac6water.png]] | [[fichier:500px-Vpnmac6water.png]] | ||
| − | Click Done | + | *Click '''Done''' |
| − | Tunnelblick has created a folder on the desktop "Empty Tunnelblick VPN Configuration". | + | *Tunnelblick has created a folder on the desktop '''"Empty Tunnelblick VPN Configuration"'''. |
| − | Copy the security certificate for your server and the file config.conf in this | + | *'''Copy the security certificate''' for your server and the '''file config.conf''' in this folder. |
| − | You can rename the file (this name will be taken to name the VPN connection) and add the extension .Tblk | + | *You can rename the file (this name will be taken to name the VPN connection) and '''add the extension .Tblk ''' |
| − | For example, rename the file seedboxVPN.tblk then confirm by clicking on Add. | + | *For example, rename the file seedboxVPN.tblk then confirm by clicking on Add. |
[[fichier:500px-Vpnmac7water.png]] | [[fichier:500px-Vpnmac7water.png]] | ||
| − | The folder becomes a file. Double-click on it to start the configuration. | + | *The folder becomes a file. '''Double-click on it to start the configuration'''. |
| − | Tunnelblick proposes to install this connection for all users or only for you. | + | *Tunnelblick proposes to install this connection for all users or only for you. |
| − | Select All Users (for all users on your computer) or Only Me (only you), depending on what you want. | + | *Select All Users (for all users on your computer) or Only Me (only you), depending on what you want. |
[[fichier:500px-Vpnmac8water.png]] | [[fichier:500px-Vpnmac8water.png]] | ||
| − | Initiate the connection from the Tunnelblick icon in the menu taskbar | + | *Initiate the connection from the Tunnelblick icon in the menu taskbar |
[[fichier:500px-Vpnmac9water.png]] | [[fichier:500px-Vpnmac9water.png]] | ||
| − | Enter your username (1) and password (2). (Available in your manager). | + | *Enter your username (1) and password (2). (Available in your manager). |
[[fichier:500px-Vpnmac10water.png]] | [[fichier:500px-Vpnmac10water.png]] | ||
| − | Now you use your VPN. | + | *Now you use your VPN. |
| − | Tunnelblick icon in the menu bar should be turned yellow. | + | *Tunnelblick icon in the menu bar should be '''turned yellow'''. |
Version actuelle datée du 16 septembre 2013 à 15:00
Information
- This software needs for people to be confortable with computing.
- If it's not your case, please have a look to PPTP VPN instead.
- VPN service is not designed to change your Ip adress.
- To do that, please have a look at our Web Proxy. (Available in this Wiki. Section 13)
- This tutorial has to be follow STEP BY STEP
Prerequisites
- You will need the OpenVPN configuration file.
Prepare a file named config.doc with the following text.
Remember to replace your servername by the name of your server seedbox Without any HTTP or FTP :
client
dev tun
remote your servername 1194
proto udp
nobind
resolv-retry infinite
persist-key
persist-tun
ca server.crt
cipher BF-CBC
comp-lzo
verb 3
auth-user-pass
route-method exe
route-delay 2
dhcp-option DNS 8.8.8.8
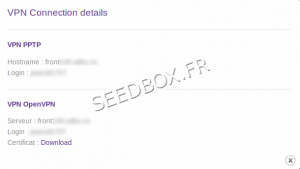
- Get the security certificate available in your manager.
- To download it, go to your manager, then in Addional Services.
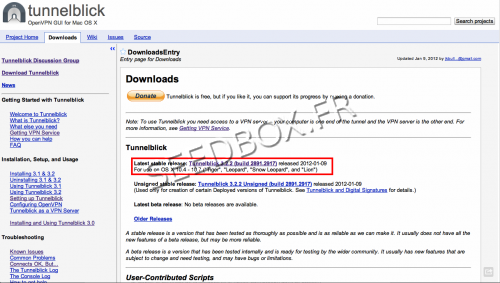
- Now, you need to download and install the VPN client Tunnelblick
- Please go to this address:
http://code.google.com/p/tunnelblick/wiki/DownloadsEntry?tm=2
Installation and Configuration
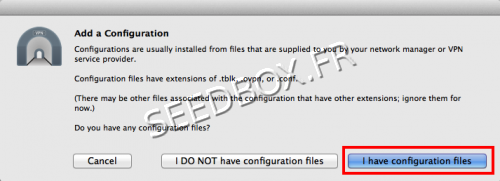
- When you launch Tunnelblick, click I Have configuration files
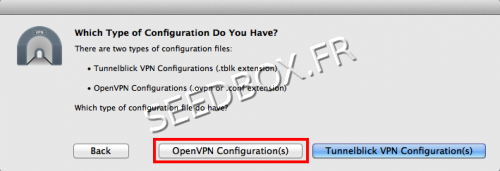
- Then, click on OpenVPN configuration
Then, click Create Tunnelblick VPN Configuration
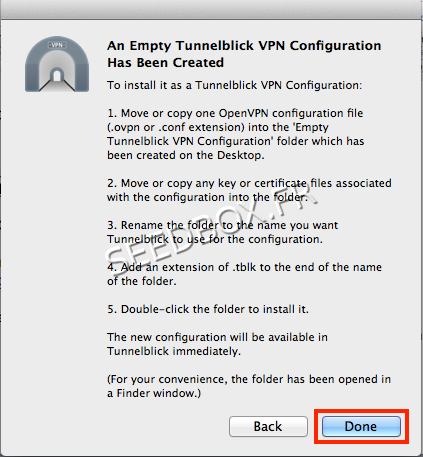
- A new window informs you that your VPN has been created.
- Click Done
- Tunnelblick has created a folder on the desktop "Empty Tunnelblick VPN Configuration".
- Copy the security certificate for your server and the file config.conf in this folder.
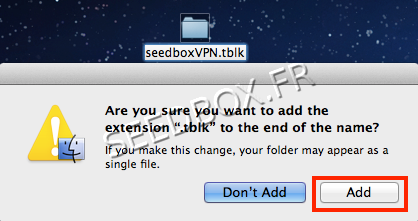
- You can rename the file (this name will be taken to name the VPN connection) and add the extension .Tblk
- For example, rename the file seedboxVPN.tblk then confirm by clicking on Add.
- The folder becomes a file. Double-click on it to start the configuration.
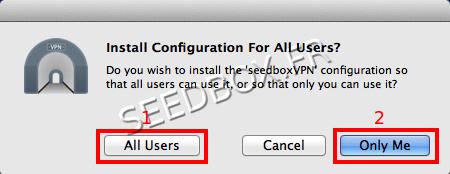
- Tunnelblick proposes to install this connection for all users or only for you.
- Select All Users (for all users on your computer) or Only Me (only you), depending on what you want.
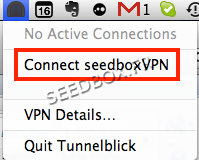
- Initiate the connection from the Tunnelblick icon in the menu taskbar
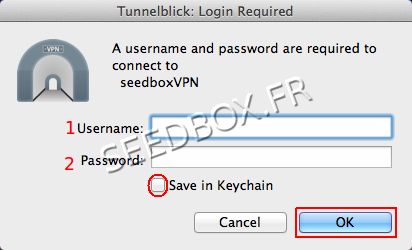
- Enter your username (1) and password (2). (Available in your manager).
- Now you use your VPN.
- Tunnelblick icon in the menu bar should be turned yellow.
