Configure the VPN for IPhone : Différence entre versions
De Documentation officielle Seedbox
Aller à la navigationAller à la recherche| (Une révision intermédiaire par le même utilisateur non affichée) | |||
| Ligne 5 : | Ligne 5 : | ||
*You only need your login details to configure your Vpn Iphone service . | *You only need your login details to configure your Vpn Iphone service . | ||
| − | * | + | *These are available in your manager or in the email you have received when your service has been created |
==Access to the configuration== | ==Access to the configuration== | ||
| Ligne 52 : | Ligne 52 : | ||
==VPN Activation == | ==VPN Activation == | ||
| − | After you clicked on Save, a screen appears allowing you to activate your VPN service. | + | *After you clicked on Save, a screen appears allowing you to activate your VPN service. |
[[Image:image_3redwater.png|thumb|none|200px|]] | [[Image:image_3redwater.png|thumb|none|200px|]] | ||
| − | To activate your VPN, set the switch to "on" (it turns blue). | + | *To activate your VPN, set the switch to "on" (it turns blue). |
| − | An icon (1) appears, that mean that the VPN is active. | + | *An icon (1) appears, that mean that the VPN is active. |
| − | The status of the vpn tells you how long it is active. | + | *The status of the vpn tells you how long it is active. |
| − | (To disable, make the switch to return "off") | + | *(To disable, make the switch to return "off") |
| − | You can also configure multiple VPN. | + | *You can also configure multiple VPN. |
Version actuelle datée du 16 septembre 2013 à 15:02
prerequisite
- It is necessary that your system is up to date, tested with iOS version 6.1.3
- You only need your login details to configure your Vpn Iphone service .
- These are available in your manager or in the email you have received when your service has been created
Access to the configuration
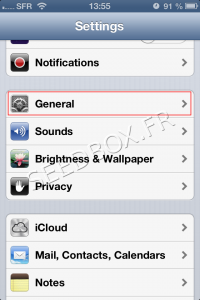
- Visit settings parameters for your iPhone through the Settings icon.
- Once in the settings, click General.
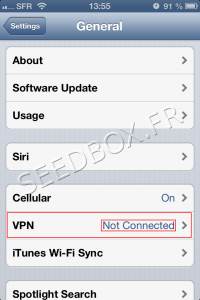
- Then, click on Vpn.
(Here is indicated the status of your Vpn (connected or not).
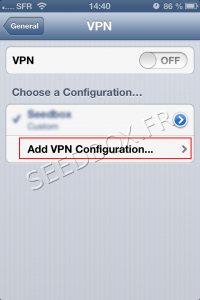
- To start configuring your Vpn, click Add VPN Configuration
- Then,
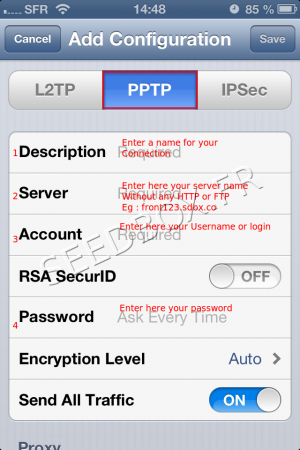
- Choose PPTP
- 1 Enter the name that you chose for your connection Vpn
- 2 Enter your servername WITHOUT ftp or http
Eg : front12X.sdbx.co
- 3 Enter your username
- 4 Enter your password.
- Once all the data are entered, click on Save
(Do not change others specifications).
Your Vpn is now configured, we will activated it.
VPN Activation
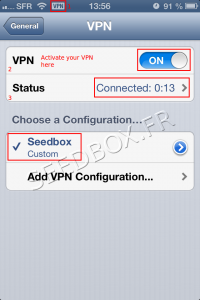
- After you clicked on Save, a screen appears allowing you to activate your VPN service.
- To activate your VPN, set the switch to "on" (it turns blue).
- An icon (1) appears, that mean that the VPN is active.
- The status of the vpn tells you how long it is active.
- (To disable, make the switch to return "off")
- You can also configure multiple VPN.
