Safe Deposit Box : Différence entre versions
De Documentation officielle Seedbox
Aller à la navigationAller à la recherche| Ligne 31 : | Ligne 31 : | ||
[[File:myfirstblibliEN.png|900px]] | [[File:myfirstblibliEN.png|900px]] | ||
| − | # | + | #Here, this is all your library. |
| − | + | #Click here to create a library, and give it the name you want. | |
| − | # | + | #Click here to delete library |
| − | + | #Click here to faind all library shared with you | |
| − | ## | + | #And here, all you are sharing. |
| − | + | #In tool, find some additiannel tools to manage files and folders. | |
| − | |||
| − | |||
| − | |||
| − | |||
| − | |||
| − | |||
| − | |||
| − | |||
| − | |||
| − | |||
| − | # | ||
| − | # | ||
| − | |||
| − | |||
| − | |||
| − | |||
==Send files to your secure area== | ==Send files to your secure area== | ||
Version du 8 mars 2018 à 14:14
Sommaire
Safe Deposit Box
Description and operation
- With this secure space, you have an extra storage space (100G) with very high availability to organize your important digital documents and retrieve them from anywhere with a computer or smartphone.
- This allows you to create encrypted directories to protect your important documents and your privacy. With the application, the ciphers are made on your computer or smartphone, which means that no password will pass through our servers.
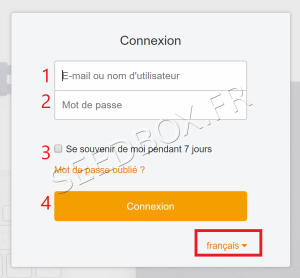
Connection
- If default luangage is not yours,
- To change it, click on "français", then choose the one that suits you.
- The connection to the secure space is made:
- 'With email address used to registered on Seedbox.fr'
- 'And the password linked to the services' (The one you chose on the order form),
- If you can not find this password again, you can change it from the "Advanced configuration" thumbnail.
- Check this box to have your login information retained
- Click here to access the service.
Secure online space
- Once your email and the password indicated, you access your online manager.
- Your first library is automatically created, you can use your service.
- Here, this is all your library.
- Click here to create a library, and give it the name you want.
- Click here to delete library
- Click here to faind all library shared with you
- And here, all you are sharing.
- In tool, find some additiannel tools to manage files and folders.
Send files to your secure area
- Go to the library, then click on "Import".
- Click here to import data to your secure area.
- Choose folder where import will be made,
- Here, we saved our first file.
Dedicated application
- To recover dedicated application for your system, follow this link: https://www.seafile.com/en/download/
- Click on the link for your operating system.
Installation
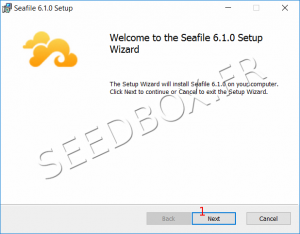
- After a quick download, open the archive as usual.
- Click on "Next"
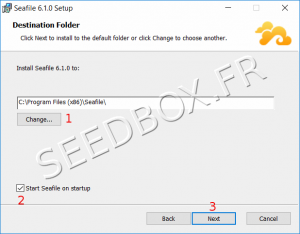
- Choose the installation directory
- Check this box to launch application at startup.
- Click on "Next".
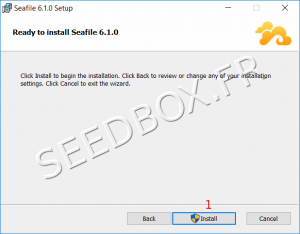
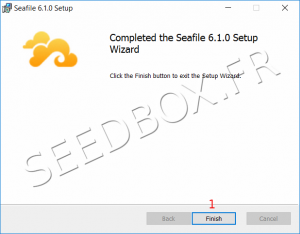
- Click on "Install".
- And Finish.
- The application installs.
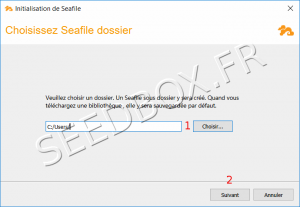
- Choose here the backup directory.
- This is the directory that will be saved automatically.
- Validate your choice by clicking on "Next".
Configure the application
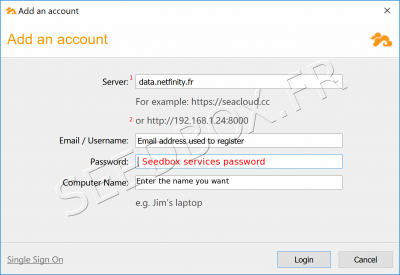
- You must now configure the application.
- Here, enter: https://data.netfinity.fr
- Do not enter ip address.
- the email address used for www.seedbox.fr website
- Then, enter service password
- Finally, specify a name. The one you want.
default library
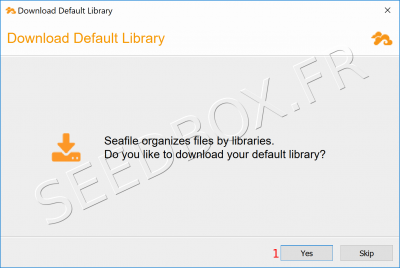
- It is proposed to download your default backup library.
- Click on "yes".
- By clicking on "Skip" you will need to choose the folder that will be the default library.
- From the application, click on "select" and choose "the folder to synchronize".
- Choose the folder to synchronize. (This will create the default library)
- You can rename it,
- To be encrypted, check the "encrypted" box.
- Indicate a password,
- Confirm it.
- The sync folder is now available. All changes made will be reflected.
- In this folder, you will be able to add all your documents, and share them securely.
- To share the documents you have synchronized from your pc,
- Right click on the library,
- Choose "See in the cloud",
- This one opens automatically through your browser.
- Choose what you want to share.
