VPN for Windows : Différence entre versions
De Documentation officielle Seedbox
Aller à la navigationAller à la recherche| Ligne 1 : | Ligne 1 : | ||
==Information== | ==Information== | ||
| − | |||
| − | |||
| − | |||
| − | |||
| − | |||
| − | |||
| − | |||
| − | |||
*''VPN service is not designed to change your Ip address.'' | *''VPN service is not designed to change your Ip address.'' | ||
Version du 22 mai 2019 à 09:28
Sommaire
Information
- VPN service is not designed to change your Ip address.
- To do that, please have a look at our Web Proxy. (Available in this Wiki. Section 13)
http://wiki.seedbox.fr/index.php/Home#Web_proxy
- This tutorial has to be follow step by step
Prerequisites
- First, you must download the OpenVPN application.
- Please go to this address:
http://openvpn.net/index.php/open-source/downloads.html
- Choose the latest version, and click on the link adapted to your system.
Download OpenVPN
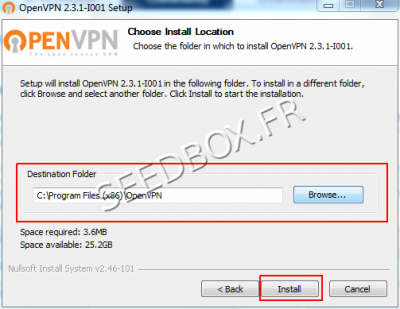
- Choose the directory to install your software.
- You can leave the default directory.
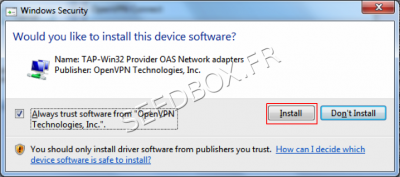
During the installation process, you will be prompted to install software.
- To work properly OpenVPN, need this software.
Get Seedbox configuration file for Openvpn
- This configuration file is available from the "VPN" thumbnail on seedbox management console.
- Click on "Generate OPENVPN file

- It is indicated that the file is generated

- Click on "Download OPENVPN file"

'Once you have saved this file to your computer,'
- From the OPENVPN icon of the Windows task bar, choose "Import file".

- Choose the previously downloaded file.
- Finally, click on "Connect".
Enable the VPN service in Windows
- To activate the VPN,
- you must go to Control Panel,
- then System and Security,
- then Administrative Tools,
- finally, click Services tab.
- To operate "OPENVPNService" must be started.
Software Activation
- Turn on your desktop, right click on OpenVPN icon and Run as administrator.
- An icon, showing OpenVPN logo must now be in the task bar.
- Right click on the icon and choose Import Files.
- A window opens asking for your login and password (available from your manager)
- You will need to enter your username and password.
Once done, you now use your VPN.
Change DNS
- If, config is ok, but internet Website can't be reach, it may be a dns problem
- Go to your Network and Sharing Center.
To do this, click the Start button, then enter the search bar Network and Sharing Center, and you will see the top of the results link to the Network and Sharing Center. Click on this link.
- In the Network and Sharing Center, click Change card settings.
- A list of your network cards and wireless cards (called Wireless Network Connection) is displayed.
- The following operation is to be reproduced for each card.
We will do it for a wireless card.
- Right click on Wireless Network Connection and click Properties.
- In properties, click Internet Protocol Version 4 (TCP/IPv4)', and then click Properties button.
- Then, click Use the following DNS server addresses,
- You can use the DNS addresses from google or OpenDNS DNS addresses
- For both providers, the addresses must always be returned in that form.
Google DNS: 8.8.8.8
For DNS or OpenDNS 208.67.222.222 208.67.220.220
- Adding a DNS server is not required.
- Finally, click OK, then Close button.
Reproduce these steps if you are connected to Internet via a LAN, USB or RJ45 (network cable).

