Configure a PPTP VPN for Linux (Gnome) : Différence entre versions
(Page créée avec « ==Configure a PPTP VPN for Mac OSX Bêta version== 1. First go into system preferences then Network. 2. In the window listing your connections Click the + button. 3. In th... ») |
|||
| Ligne 1 : | Ligne 1 : | ||
| − | == | + | ==prerequisite== |
| − | + | Please be sure that the package named network-manager-pptp is available for your system. | |
| − | + | Otherwise, download it via the package management system. | |
| − | + | After installing this package, it is necessary to restart your computer. | |
| − | + | ==Configure the PPTP VPn connection.== | |
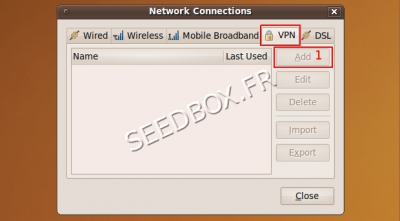
| − | + | Start by browsing to System, Preferences, then Network Connections and finally VPN. | |
| − | + | [[Fichier:ubuntuvpnsetup1.png|thumb|none|400px]] | |
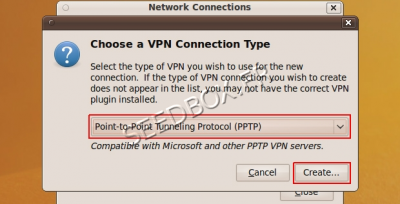
| − | + | Click on ''Add'', then select Point-to-Point Tunneling Protocol (PPTP) in the drop-down and click Create. | |
| − | + | [[Fichier:ubuntuvpnsetup2.png|thumb|none|400px]] | |
| − | |||
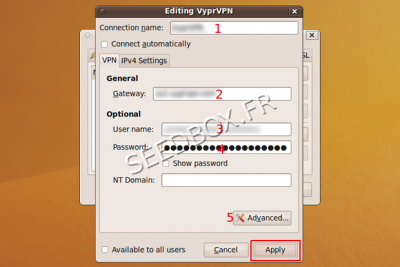
| − | + | Then, you need to enter details, | |
| − | + | [[Fichier:ubuntuvpnsetup3.png|thumb|none|400px]] | |
| + | |||
| + | |||
| + | |||
| + | 1- Named your vpn in Connection name. | ||
| + | |||
| + | 2- In Gateway, enter your servername without any FTP or HTTP. (it's available in your manager in details section). | ||
| + | |||
| + | Eg : front12X.sdbx.co | ||
| + | |||
| + | 3-4 Then enter your username and password. (available in your manager or in your welcome email). | ||
| + | |||
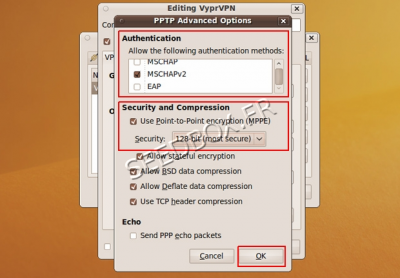
| + | Then, once is filled, click on ''Advanced'' | ||
| + | |||
| + | [[Fichier:ubuntupptpadvancedred.png|thumb|none|400px]] | ||
| + | |||
| + | In ''Autenthification'', '''no change has to be made'''. | ||
| + | |||
| + | In the Security and Compression section, check the box for '''Use Point-to-Point encryption (MPPE)''' and select the default option in the drop-down below it. | ||
| + | |||
| + | Then, click ''ok'' | ||
Version du 19 avril 2013 à 08:22
prerequisite
Please be sure that the package named network-manager-pptp is available for your system.
Otherwise, download it via the package management system.
After installing this package, it is necessary to restart your computer.
Configure the PPTP VPn connection.
Start by browsing to System, Preferences, then Network Connections and finally VPN.
Click on Add, then select Point-to-Point Tunneling Protocol (PPTP) in the drop-down and click Create.
Then, you need to enter details,
1- Named your vpn in Connection name.
2- In Gateway, enter your servername without any FTP or HTTP. (it's available in your manager in details section).
Eg : front12X.sdbx.co
3-4 Then enter your username and password. (available in your manager or in your welcome email).
Then, once is filled, click on Advanced
In Autenthification, no change has to be made.
In the Security and Compression section, check the box for Use Point-to-Point encryption (MPPE) and select the default option in the drop-down below it.
Then, click ok


