Useful Tips with Cyberduck
De Documentation officielle Seedbox
Révision datée du 21 octobre 2013 à 13:25 par Pascal (discussion | contributions) (→Get additional information on a file)
Set up a Proxy connection with Cyberduck
Note: The configuration of your proxy service is optional. It should only be done if you get the error message "Time Out" type.
- The use of proxy service with Cyberduck forced to use the proxy for all your Internet connections.
- First, an FTP connection need to has been set up
(To set up an FTP connection, refer to section 2.1 of this tutorial you)
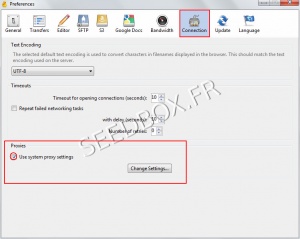
- Once configured it, click on "Edit" from Cyberduck taskbar, then "Preferences".
- A new window opens, click now on "Connection"
- Then, tick the box "Use system proxy settings" and finally "Change settings"
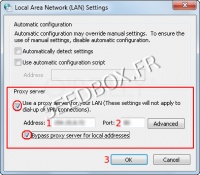
- Record in Box address, your server adress WITHOUT any HTTP or FTP before.
- Click OK to save your configuration .
- Your proxy is now configured and ready for use .
- You will need your login and password password to use it .
- These are available in your manager in the Additional Services.
You can use for your proxy several Ips.
You can check these into "Additionnal Services" then "Proxy service".


