Customer area 2.82
De Documentation officielle Seedbox
Sommaire
How to connect to your Manager
- It is done in two steps.
- First, you must enter your login and password. (These are the ones you selected during registration.)
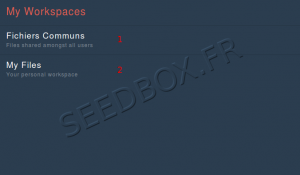
- After login correctly, you are redirected to this page:
- (1) Here, you can choose to access shared files for all users.
- (2) Here, you can access your personal files and folders.
- To direct access to your personal files next time, select "My files" and then click "Use this Workspace as defaut", then confirm your choice by clicking "Enter".
- At top of this page, there is a task bar.
- return to your manager Home page.
- Since the task bar you can edit your profile.
- Manage your shares.
- Manage users and groups created.
- Click here to log out.
Edit your profil
Change some parameters here, will not change parameters for others services.
It means that if you change your password here, it will not change your password for FTP service or Transmission-remote.
- You can enter your name.
- You can insert a profile image
- You can specify an email address.
- You can specify a particular country.
- You can choose a language other than English for your interface.
- You can choose a default interface when connecting.
- Click here to save your changes
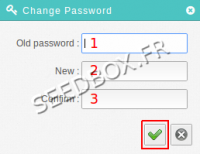
- Allow you to change password ONLY for this interface.
Change your password
- Enter here your current password.
- Enter here your new password
- Confirm it.
- Once it's ok, click on "validate".
- Since this thumbnail, you can view and edit your shared files and folders.
- Here, you can manage your shared files.
- Displays from what location the file is shared.
- Displays the number of downloads allowed on this file.
- Displays the password chosen for sharing.
- Displays the date of distribution of this file.
- Allows you to delete the selected file.
- Allows you to obtain and copy the URL of the file.
- Allows you to reset sharing options
- Allows you to perform cleanup for no longer shared files. (For example, limit the number of downloads has been reached.)
Files Manager home page
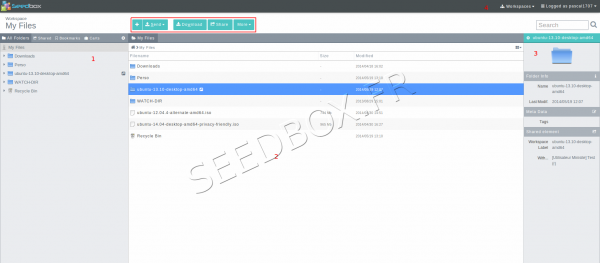
- It contains all that you downloaded online, sent from your computer to your server, or transfer via ftp from another server.
- Your folders.
- All of your files and folders. Here you can perform actions on your files.
- The right part deliver some informations abiout selected file.
- Here you can choose which display space. Tells you the name of the user.
Worksapces
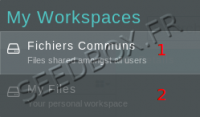
- Here, you can switch between your space management and data files common to all users.
- By clicking displayed login at top right of your interface, you can return to your manager homepage, or disconnect.
Left column
- It includes all downloaded or sent files to your storage space.
Here, you can find
- all your folders.
- all your shered elements.
- All bookmarked files and folders.
- All your carts.
Carts
- This function allows you to group multiple files and/or folders to download or share.
- To add files to the list, simply drag it from of your manager central part,to your cart.
- A created cart and its contain.
- Click on this icon to create a new cart.
- Click on this icon to delete cart contents.
- Click on this icon to download cart contents.
- Click on this icon to share cart contents.
- If you create a cart and then, disconnect, your content cart will be remove.
Your Manager central part
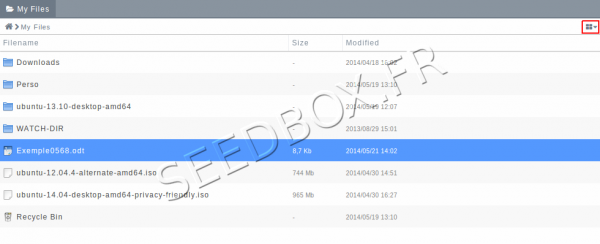
- Here are listed all files and folders.
- You can switch display mode by clicking icon top right
- You can perform some actions on your files here.
- Click here,
- To create a new file or a new folder.
- To send data from your computer or from an other server.
- To download selected file.
- To view or edit a file.
- To share data
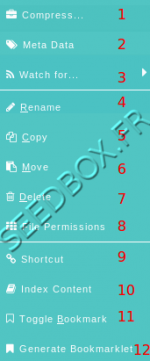
- "More" icon allow you to acces more option.
- Make a .zip file
- Add tag
- Allow to be notified when changes are made on the share document
- Change file name
- Copy the file
- Move the file to another folder
- delete the file
- Change persmission
- Create a short cut
- Add index for the file
- Add bookmark on file
Right manager column
- After you have selected a file, you can find in the right column complementary information about it.
- Resume file info
- Show if tag has been added. Here you can add also tag
- gives informations about sharing option
- Informations given here depends of what files is choosen.
sharing function
- Your file manager makes it easy to share files and folders.
- It is then suggested to create user. (You will be able to select with whom you share your files.)
Create user
- Here, you can
- Choose an username
- Choose a password
- Enter username
- Enter a valide mail adress
- You can define user language.
- Once users has been created, you can easily share files with them.
- If you assign password for users, they will need it to connect.
- To share a file, go to your manager, then select the file to share.
- click on the "Share" button in the task bar.
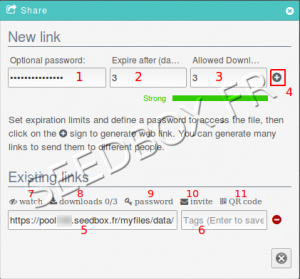
- Then, a new window opens
- You can add a password to protect link (optionnal)
- You can define for how many days this link will be available.
- You can define for how many downloads this link will be available.
- Click on the cross to generate share link.
- Here, you can find generate sharing link
- Here you can add tag.
- Allow you to see if changes are made on shared link.
- Show how many download can be made.
- Show if a password is enable for this link.
- Click on Invite to share your link.
- Generates a QR code to share.
- Once your file selected, then sharing options set, you must invite those with whom you want to share this file.
- To do this, click on Invite (10)
- The invitation window opens:
- Here, you can set a name fot this sharing
- Choose with whom share your link
- If you have already created users , enter the first few letters of its name, the system will offer you a selection.
- If not, it is necessary to enter the email address for the people with whom you want to share.
- You can change subject message.
- This is the link that people with whom you share the file will receive.
- Your subscriber will receive this message via its mailbox:
- He can simply click on the blue link.
- A new window will open :
- Without a pasword set :
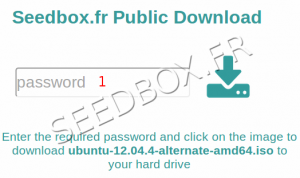
2. With a password set:
- If you have protected your shares with a password, you must provide it to your correspondent.
- Adding a password is optionnal, if you do not protect your file, the person receiving the email can get it directly.
- First, choose what folder to share, then click on Share from taskdbar.
- Once you have choosen how to share file, a new widows opens
- Here, you can see and make some changes about.
- File name.
- Who share the folder and when
- Enter with whom you want to share this folder and their acces rights.
- Please, be very careful when you change permissions.
- If changes are made on files, they will be final.
- Click here to know when changes are made on this folder.
- Click here to sent sharing email
- Click here to stop sharing this folder
- Click here to validate.
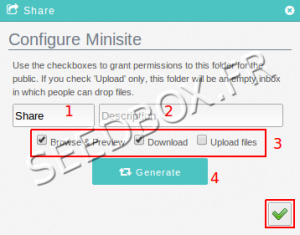
- Your manager allows file sharing as a mini website.
- Users will have access via your workspace only to the files and folders you want to share.
- Select from your manager the folder to share and select "Sharing as a mini public site"
- Folder name
- You can add a small description for your share.
- Here, you can change permissions for this folder.
- Please remember to use this with caution
- Click now on "Generate"
- The weblink has now been generate.
- click here to be notified when changes are made on the folder
- click here to send link
- click here to generate QR code and share it
- click here to stop sharing this link
- your correspondent will receive in its mailbox, this link :
- He just need to click on the link to open it.
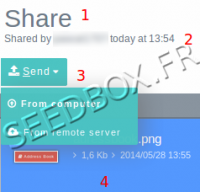
- For example, when you allow "Upload" function, people can add files in folder.
- Folder name
- Who and when this folder has been shared
- actions that can be made on folder
- Here, upload file into share folder
- file that has been upload.

