Download and Configure Cyberduck : Différence entre versions
De Documentation officielle Seedbox
Aller à la navigationAller à la recherche| (10 révisions intermédiaires par le même utilisateur non affichées) | |||
| Ligne 1 : | Ligne 1 : | ||
| − | + | =How configure Cyberduck for Mac OSX ?= | |
| + | *First, to download Cyberduck, please follow this link : http://cyberduck.ch/ | ||
| − | * | + | *Choose the latest version. |
| − | |||
| − | |||
| − | |||
*During the installation background process, we recommend that you do not change default choice. | *During the installation background process, we recommend that you do not change default choice. | ||
| Ligne 17 : | Ligne 15 : | ||
[[image:barredetacheredwater1.jpg|500px|]] | [[image:barredetacheredwater1.jpg|500px|]] | ||
| − | |||
| − | |||
Then, | Then, | ||
| − | |||
[[image:Captureftpconfigredflouwater.jpg|300px|]] | [[image:Captureftpconfigredflouwater.jpg|300px|]] | ||
| − | |||
#Choose connection type. here <span style=color:red>'''FTP''' | #Choose connection type. here <span style=color:red>'''FTP''' | ||
| Ligne 32 : | Ligne 26 : | ||
#Enter <span style=color:red>'''your password''' </span>(The one chosen on your order form) | #Enter <span style=color:red>'''your password''' </span>(The one chosen on your order form) | ||
| − | + | #You will find in your manager, FTP connection details. [[image:Webdavftpicongood.png|80px]] | |
| + | |||
| + | |||
| + | * For any question, contact us via : | ||
| + | #Ticket support, | ||
| + | #Live Chat available from your manager. | ||
| + | |||
Finally, click '''Connect'''. | Finally, click '''Connect'''. | ||
| − | =Set up a proxy service with Cyberduck= | + | ==Set up a proxy service with Cyberduck== |
| Ligne 46 : | Ligne 46 : | ||
*'''Once your FTP connection is set up''', | *'''Once your FTP connection is set up''', | ||
| − | # | + | #Go to Cyberduck '''preferences''' . |
#From task bar, click '''Edit''', then '''Preferences'''. | #From task bar, click '''Edit''', then '''Preferences'''. | ||
#Select '''Connection tab'''. | #Select '''Connection tab'''. | ||
| Ligne 52 : | Ligne 52 : | ||
#Finally, click '''Change settings'''. | #Finally, click '''Change settings'''. | ||
| + | [[image:proxy for macOSX0.png|300px|]] | ||
*Now you need to configure your connection. | *Now you need to configure your connection. | ||
| − | |||
[[image:proxy for macOSX1.png|300px|]] | [[image:proxy for macOSX1.png|300px|]] | ||
| Ligne 63 : | Ligne 63 : | ||
*Here you need to enter your proxy hostname and its port. | *Here you need to enter your proxy hostname and its port. | ||
| − | *You can find your proxy adress and port , in | + | *You can find your proxy adress and port , in "Advanced configuration" thumbnail.. |
| − | |||
| − | |||
| − | + | *For Example : pool123.seedbox.fr (Please notice that NO HTTP or FTP has been added) | |
Version actuelle datée du 1 juillet 2019 à 17:09
How configure Cyberduck for Mac OSX ?
- First, to download Cyberduck, please follow this link : http://cyberduck.ch/
- Choose the latest version.
- During the installation background process, we recommend that you do not change default choice.
- When you first launch Cyberduck and only if you have Filezilla software, you will be prompted to import your favourites.
- To do this, click on "Import Bookmarks", otherwise click "Cancel".
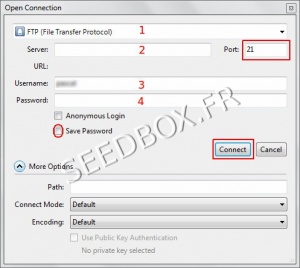
- To configure an FTP connection, click Open Connection icon from the task bar.
Then,
- Choose connection type. here FTP
- Enter your server address WITHOUT ftp or http
- Do not change the preset Port
- Enter your username (The one chosen on your order form)
- Enter your password (The one chosen on your order form)
- For any question, contact us via :
- Ticket support,
- Live Chat available from your manager.
Finally, click Connect.
Set up a proxy service with Cyberduck
Note: Configure a proxy service is optional.
*It should be done only if you get Time Out error message
- Use proxy service with Cyberduck forced to use the proxy for all your Internet connections.
- Once your FTP connection is set up,
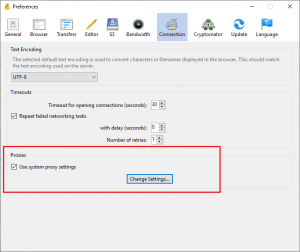
- Go to Cyberduck preferences .
- From task bar, click Edit, then Preferences.
- Select Connection tab.
- Then check the box Use proxy system settings.
- Finally, click Change settings.
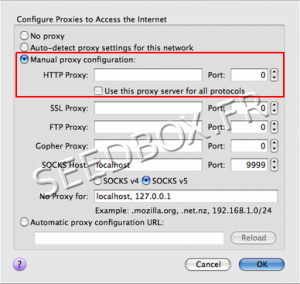
- Now you need to configure your connection.
- Choose Manual proxy configuration.
- Here you need to enter your proxy hostname and its port.
- You can find your proxy adress and port , in "Advanced configuration" thumbnail..
- For Example : pool123.seedbox.fr (Please notice that NO HTTP or FTP has been added)


