Filezilla for Windows
De Documentation officielle Seedbox
Aller à la navigationAller à la rechercheSommaire
Download and install FileZilla
- For any question, contact us via :
- Ticket support,
- Live Chat available from your manager.
Download the latest version
- Go to this address :
http://filezilla-project.org/download.php?type=client
- Then, download Filezilla.
Installing FileZilla
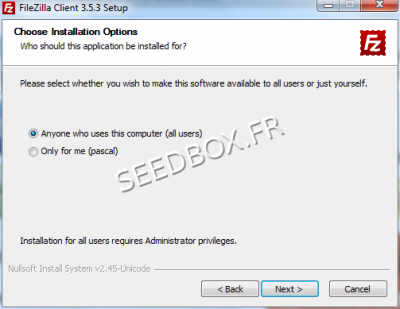
- For all set up stages, we advise you not to change defaults settings.
- Here you can select whether the software is installed for all users (you must have administrator rights to do so) or just for you.
- Filezilla is now installed on your PC
Configure FTP connection
- After installing the software, configure FileZilla to connect with your service.
- You can configure FileZilla to manage multiple connections to several different service.
- To start, click on the icon located on your desktop.
Filezilla runs and a new window appears.
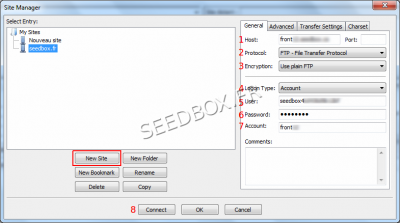
- To configure Filezilla, click on File, then Site Manager, New Site.
Your ftp connection details can be found in your welcome email or in Advanced configuration thumbnail.
- Enter your server address name without ftp or http.
- For example : pool123.seedbox.fr
- Let the port box empty or enter port 21. No other port will be allow here
- For example : pool123.seedbox.fr
- Choose FTP protocol
- Choose an encryption type
- You can choose plain FTP or TLS if available.
- Logon type must be account
- Enter your username (The one chosen on your order form)
- Enter your password (The one chosen on your order form)
- Enter an account name (Here, you can choose the one that suits you)
- Confirm by clicking OK
- Filezilla is ready to use with your service.
Configure a proxy service with Filezilla
- To set up your proxy service with Filezilla, from software taskbar,
- Go to Edit,
- Then Settings,
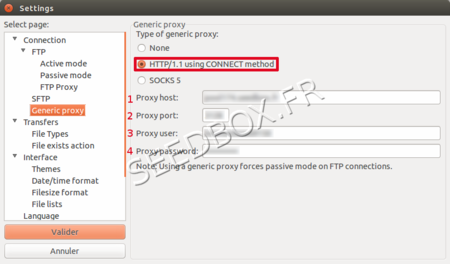
- Click on Generic Proxy
- Choose HTTP/1.1 using CONNECT method
- Enter your servername without any http or ftp.
- Enter the proxy port chosen. (4 Ips are available)
- Enter your Login. (The one chosen on your order form)
- Enter your Password. (The one chosen on your order form)
Presentation and use FileZilla to manage files
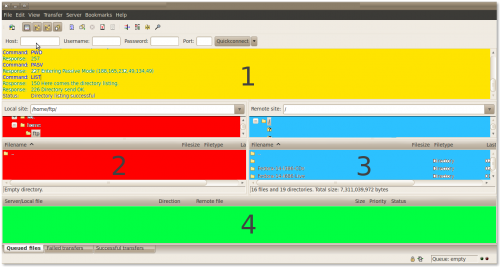
- Once connected, FileZilla interface looks like this:
- 1 = Messages sent and received by service.
- 2 = What's in your own computer
- 3 = Contents of your service
- 4 = Information transfer (success, failure or waiting etc.)
Transferring a file from your service to your PC
- To transfer a file from service to your computer, simply select it from the zone 3 and make a right click to select Download
Transfer a file from your computer to the online service
- To transfer a file from your computer to your service, simply select it from the zone 2 and make a right click to select Upload
Transfer a file from your server to your computer
- To transfer a file from your server to your computer, simply make a right click on the file and choose download.
Transfer a file from your computer to your server
- Choose the file to be sent from your hard drive to your server, then right click.
- Choose Send.
Other filezilla function
Through this program, you can also:
- Create queues, delete files and folders, create folders, check disk space, rename files or folders.
- It is also possible to transfer files and folders simply by drag / drop from your server to your computer and conversely.
- For a complete view of what filezilla can do, please consult the official guides.


