How to use Webdav
De Documentation officielle Seedbox
Aller à la navigationAller à la rechercheSommaire
Using Webdav
Configure the network drive for Windows system
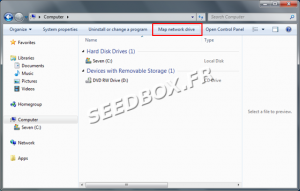
- To configure a network drive, first click on the icon "computer" from your desktop.
- Then click, "map a network drive"
- First, choose the letter you want to give to that network drive.
- Then, in folder, enter the address of the network drive.
You must enter the server address exactly as it is shown in ![]() thumbnail
thumbnail
- Click on finish.
- It only remains to connect to your network drive.
- To do this, grab your login and password.
- Through "Detail" thumbnail available from seedbox Manager, you will find your login and you will be able to change service password.
Note: Please remember that any action carried out through webdav affect data that are in your server. If you delete a file or folder through webdav, it is also deleted on your server.
Configure a network drive for MacOSX
Configure a network drive for Ubuntu system
- To configure a Webdav service with Ubuntu, you need to access to "Network" tab.
To do this, :
- launch a file management software, for us "Dolphin", and click on "Network" tab.
- Now, click "Add Network Location" or "Add Network Floder".
- Choose "WebFolder" (webdav)
You are asked to fill in some information.
- Name: Choose a name that suits you.
- User: Indicate your login.
- Server: Specify your server address without any http or https. For example: pool185.seedbox.fr
- Port: Leave default choice.
- Folder: Indicate your login. Example: userseedbox
Configure a network drive for Android system
- Download this App
To download this app please follow this link :
https://play.google.com/store/apps/details?id=com.alphainventor.filemanager
And, follow usual installation process for your applications.
- If you encoutered some issues, do not hesitate to contact us via :
- Live Chat,
- Ticket support.
To configure this application, you will need "WEBDAV" connection details available from your manager in ![]() thumbnail
thumbnail
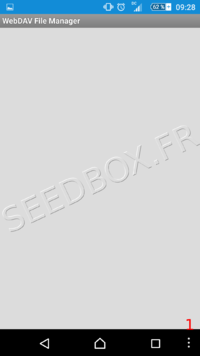
- Open this application,
- Then, click on 1 icon and choose "Add Server".
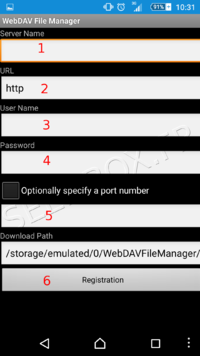
Then,
- Enter a name for this connection, the one you want.
- Enter here the URL of your service.
- This URL is available from your manager, in "Advanced configuration".
- It must be enter exactly as the one displayed in your manager.
- Enter the login chosen on your order form. It is also available in Additional services.
- Enter the password chosen on your order form.
- If you have lost it, you can request a new one, through "Advanced Configuration" thumbnail.
- Here, leave the box blank.
- Finally, click "Registaration", your service is configured and ready for use.
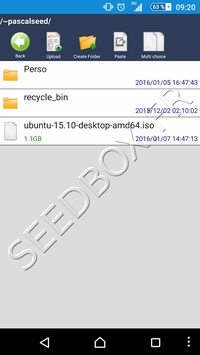
Once configured, data manager content is displayed.


