Filezilla for MacOSX : Différence entre versions
De Documentation officielle Seedbox
Aller à la navigationAller à la recherche| Ligne 34 : | Ligne 34 : | ||
Finally, click on ''New Site'' | Finally, click on ''New Site'' | ||
| − | |||
| − | |||
| − | |||
| − | |||
| − | |||
| − | |||
| − | |||
| − | |||
| − | |||
| − | |||
| − | |||
| − | |||
| − | |||
| − | |||
| − | |||
| − | |||
| − | |||
| − | |||
| − | |||
| − | |||
| − | |||
| − | |||
| − | |||
| − | |||
| − | |||
Version du 18 septembre 2014 à 13:02
Download Filezilla
- Please follow this link to download Filezilla .
https://filezilla-project.org/download.php?type=client
Configure Filezilla
- Install this software as you usually do.
- We recommend to not change defaults settings.
Then,
- You will need your connection details. (These credentials are available in your manager or in the welcome email received.)
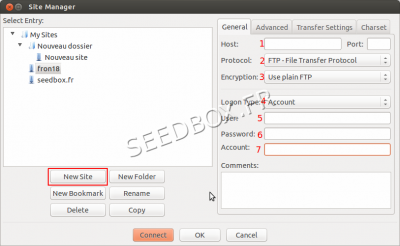
- Launch your software, and click on "Site Manager".
- 1 In Host, enter your servername without any HTTP or FTP.
- 2, In Protocole, choose FTP.
- 3, In Encryption, choose Plain FTP
- 4, Logon Type, Must be account.
- 5, Enter here your Login
- 6, Enter here your password.
- 7, Choose a name for your account.
Finally, click on New Site
