PPTP VPN for Windows Seven : Différence entre versions
De Documentation officielle Seedbox
Aller à la navigationAller à la recherche (Page créée avec « ==Configure the PPTP VPN== Open “Networks and Sharing Center” (1) from “Control Panel”. thumb|none|400px| Then choose... ») |
|||
| (2 révisions intermédiaires par le même utilisateur non affichées) | |||
| Ligne 1 : | Ligne 1 : | ||
| + | ==Informations== | ||
| + | |||
| + | *VPN service is not designed to change your Ip adress. | ||
| + | |||
| + | *To do that, please have a look at our Web Proxy. (Available in this Wiki. Please reffers to your broswer) | ||
| + | |||
==Configure the PPTP VPN== | ==Configure the PPTP VPN== | ||
| − | Open “Networks and Sharing Center” (1) from “Control Panel”. | + | *Open '''“Networks and Sharing Center”''' (1) from '''“Control Panel”'''. |
| + | |||
[[Image:Windows7-PPTP-VPN-Setup-1water.png|thumb|none|400px|]] | [[Image:Windows7-PPTP-VPN-Setup-1water.png|thumb|none|400px|]] | ||
| − | Then choose “Set up a new connection or Network” (2). | + | *Then choose '''“Set up a new connection or Network”''' (2). |
| + | |||
[[Image:Windows7-PPTP-VPN-Setup-2water.png|thumb|none|400px|]] | [[Image:Windows7-PPTP-VPN-Setup-2water.png|thumb|none|400px|]] | ||
| − | Choose “Connect to a workplace” (3) and click “Next” (4). | + | |
| + | *Choose '''“Connect to a workplace”''' (3) and click '''“Next”''' (4). | ||
| + | |||
[[Image:Windows7-PPTP-VPN-Setup-3water.png|thumb|none|400px|]] | [[Image:Windows7-PPTP-VPN-Setup-3water.png|thumb|none|400px|]] | ||
| − | Click on “Use my Internet connection (VPN)” (5). | + | |
| + | *Click on '''“Use my Internet connection (VPN)”''' (5). | ||
| + | |||
[[Image:Windows7-PPTP-VPN-Setup-4water.png|thumb|none|400px|]] | [[Image:Windows7-PPTP-VPN-Setup-4water.png|thumb|none|400px|]] | ||
| − | In “Internet address” field (6) | + | *In ''''“Internet address”''' field (6) enter '''your servername WITHOUT any HTTP or FTP''' |
Eg : front12X.sdbx.co | Eg : front12X.sdbx.co | ||
| − | In “Destination name” (7) field enter a name for your connection. | + | *In “Destination name” (7) field enter a name for your connection. |
| − | Also check the “Don’t connect now, just set it up so I can connect later” (8). | + | |
| + | *Also check the box “Don’t connect now, just set it up so I can connect later” (8). | ||
Click “Next” (9) | Click “Next” (9) | ||
| Ligne 31 : | Ligne 44 : | ||
| − | Enter your username (10) and password (11) from Seedbox in the next window and click “Create” (12). | + | *Enter your '''username (10) and password''' (11) from Seedbox ''(these that you have entered on the order form)'' in the next window and click '''“Create”''' (12). |
[[Image:Windows7-PPTP-VPN-Setup-6water.png|thumb|none|400px|]] | [[Image:Windows7-PPTP-VPN-Setup-6water.png|thumb|none|400px|]] | ||
| Ligne 37 : | Ligne 50 : | ||
| − | You should see this screen next. Click on ''Connect Now'' . | + | *You should see this screen next. Click on '''Connect Now''' . |
[[Image:Windows7-PPTP-VPN-Setup-7water.png|thumb|none|400px|]] | [[Image:Windows7-PPTP-VPN-Setup-7water.png|thumb|none|400px|]] | ||
| − | Your VPN service is now ready to be used. | + | *Your VPN service is now ready to be used. |
Version actuelle datée du 20 septembre 2013 à 12:50
Informations
- VPN service is not designed to change your Ip adress.
- To do that, please have a look at our Web Proxy. (Available in this Wiki. Please reffers to your broswer)
Configure the PPTP VPN
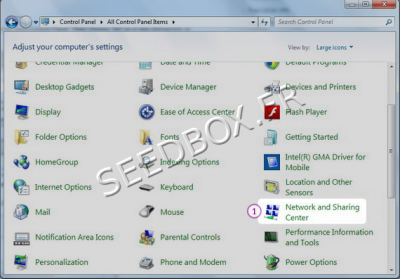
- Open “Networks and Sharing Center” (1) from “Control Panel”.
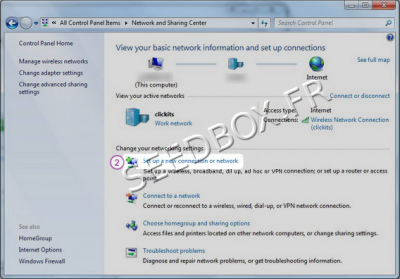
- Then choose “Set up a new connection or Network” (2).
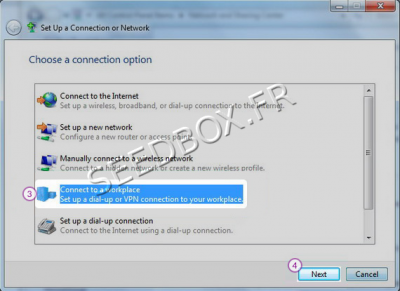
- Choose “Connect to a workplace” (3) and click “Next” (4).
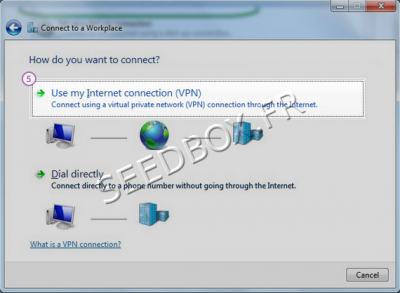
- Click on “Use my Internet connection (VPN)” (5).
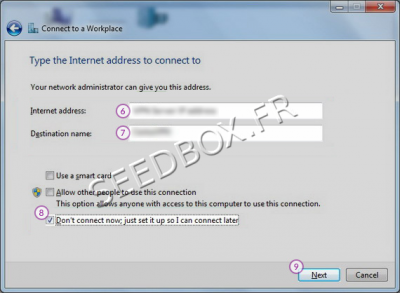
- In '“Internet address” field (6) enter your servername WITHOUT any HTTP or FTP
Eg : front12X.sdbx.co
- In “Destination name” (7) field enter a name for your connection.
- Also check the box “Don’t connect now, just set it up so I can connect later” (8).
Click “Next” (9)
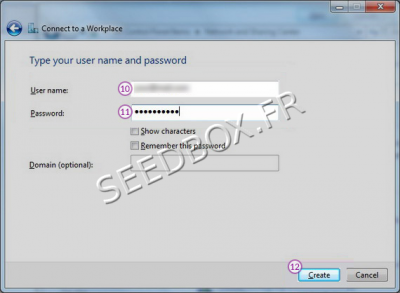
- Enter your username (10) and password (11) from Seedbox (these that you have entered on the order form) in the next window and click “Create” (12).
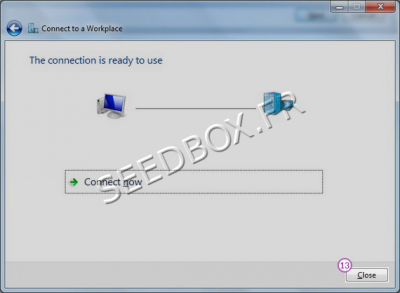
- You should see this screen next. Click on Connect Now .
- Your VPN service is now ready to be used.
